| reciprocal rafters locked in place |
|
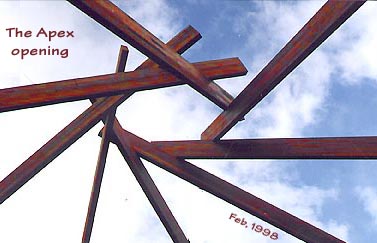
Reciprocal Force Rafters
the central roof - it became known to me as a "reciprocal force rafter" structure - a voyage of discovery.
These 225 X 75 laminated beams are locked together by their own weight and are sitting on their upstands without fixings -
a falling pinwheel, deftly caught in mid-air by the walls.
|
Getting ready
Trijntje is oiling the uprights - they are 2 cutoffs from the outer roof rafters bolts to the hip rafter.
We used 2 wedges to turn the angle of these uprights to match the direction the beams which are not radial, they're more tangentially arranged.
The plans called for 2 trip-l-grips fixing the hip rafters to the top plate as the total tie-down for the reciprocal rafters. This seemed very optimistic to me.
|
|
Trijntje oiling the beam support uprights |
| platform support at the ground level |
|
Ground level
The 2 trusty trestles were brought in as a base for the platform we needed level with the top of the walls (about 4m high)
The two vertical pine 3" X 2" pieces bore the weight of the centre of the platform, the ends rested on the top plate of the inner octagon.
|
| the platform
We had to use 3" X 2" purlin material to span the 6 metres between the walls and screw the 6m oregon planks to them to create a wide platform spanning the room.
Another plank became the chute up which we would slide the beams.
|
| >
the chute |
| the beams in place |
|
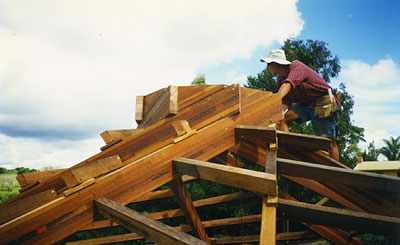
Roof Raising
It took a day to get the rafters into place and it was a saga indeed. The action took place on and above the platform some 4 metres in the air.
First we placed the first beam - not a trivial matter as there was nothing to place it on - it just had to be suspended in precisely the right location in 3 dimensions with no real points to measure from.
|
We used string lines at ground level to pinpoint the angle of the first beam, then a plumb-bob to calculate where we thought in space the end of the beam would be.
It became apparent that no matter how well we measured the location for the first beam, we wouldn't really know if we were out until the last beam was ready to be put in place.
|
By then the first beam would be supporting the weight of 6 other beams which would make it quite heavy.
We slid each heavy beam up the chute - an adventure for the one on the ground - to the platform and arranged them roughly where they would sit above.
We used a piece of 4" X 2" hardwood (about 4' long) for the prop which would rest on top of a sawhorse platform on top of the main platform.
|
|
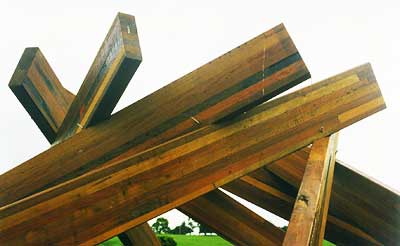
How they looked in relation to the walls |
| This is how they looked up close |
|
And we sat the first beam on top of the prop and clamped the bottom end in its support
As we added each beam we needed to chisel out the top of the bottom beam to match the bottom of the top beam - this was to allow the beams to slide to accommodate any movement needed to fit the eighth beam.
Once each beam was in place we used a single 3" galvanised nail to keep it in place as well as clamping the other end in its support.
|
The need to get higher
Eventually we came to the last beam - the one which would complete the reciprocal rafter roof structure and lock it all in place.
It turned out we had been 20mm (less than an inch) too low with the first beam and fitting the final beam meant we needed to raise the 7 beams in place a vertical distance of 20 mm.
The sun was low in the western sky and we were feeling a strong pressure to complete the beams before darkness.
We could not move the bottom beam at all - no combination of levers, fulcrums, props or shoving in any direction made the slightest impression.
During these investigations we noticed that the prop top did not exactly match the bottom of the beam and there was a wedge shaped gap which would allow the introduction of the thin end of a wedge.
|
|
The beams bolted to their supports
note: no bracing required |
| A final inspection before the tin is added |
|
Using one of the birds-mouth cutouts from the rafters (a 10º wedge) and a series of full-blooded swings of a 14-lb sledge-hammer the beams were ever-so-gradually raised.
This naturally meant the beams were all dragged across their lower support surfaces and our decision to use angled faces rather than flat ones was revealed as a sound decision.
We were able to insert the final beam just as the sun set and the moment of truth arrived.
|
The moment of Truth
The beams were all in place, the theory was to remove the prop and the roof should stay in place.
About this time I realized that I had never seen this done or even talked to anyone who had done it, we were 6 metres up in the air, surrounded by over a tonne of very hard timber beams and, if it didn't stay in place, it was likely to become very ugly, very fast.
|
|
The finished collar from the inside |
The finished collar from the outside
the council insisted on these
superfluous brackets &4XM10 bolts |
|
Just in Time
Still the bullet had to be bitten and light was fading fast, all bracing was removed and another mighty swing of the sledge hammer removed the prop.
The timbers shifted not at all, there was no settling into place - they remained still and silent and simply sat there, unsupported and looking as if they had been there for years.
I am sure there were many unseen influences adding immeasurable support in that moment - it was a great moment to see the rafters supporting each other and feeling so solid even though there were just a few nails, not even hammered home, as the only fixings.
It was 3 days before we returned to start bolting the bottoms of the beams to their supports and the beams simply sat there, unmoved.
|
Ready for the tin
The joists were a unique experience - every sawcut was a compound mitre - even the clerestory window frames were angled.
However there were eight more-or-less identical roof sections.
The first one was slow and involved a lot of thinking time over a full day.
The last one only took us 2 hours.
|
|
The reciprocal Rafter Roof ready for the tin |
| a last look at the sky through the roof structure | >
|
Ready for
the tin
The joists were a unique experience - every sawcut was a compound mitre - even the clerestory window frames were angled.
|
|
 i i |
|
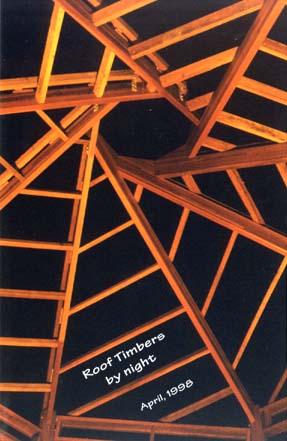
The roof as seen from the ground at night |
| starting the cladding |
|
Icing the cake
Now we had to clad the roof with tin - although it was autumn, the white tin gave us quite an underarm tanning opportunity with the reflected light.
As usual, the first segment took a lot of thinking time and deliberation but the last one was swiftly and surely done.
|
Farewell the open sky
The interior changed its character completely - the alfoil insulation giving a space-age feel.
It was so fantastic to at last stand, surrounded by earth and know that the flooring material was drying out - and would continue to do so even when it rained!!
|
|
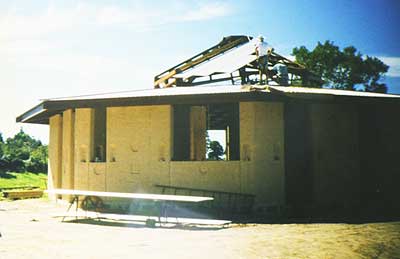
The main room covered |
| the climb to the top |
|
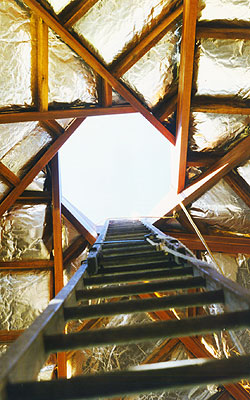
Stairway to heaven
The central opening was still uncovered and the ladder just reached it (it was a tad over 6 metres from the ground).
The climb up the ladder was something very few attempted, and those that did refused to come down the same way, preferring to exit through the hole and down the outside.
|
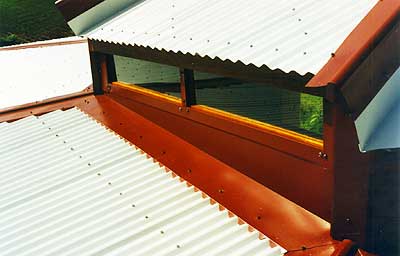
| the clerestory, glazed and flashed and water-proof! |
|
|
| The roof clad and wearing the temporary plastic cupola |
|
The inside starts to dry out
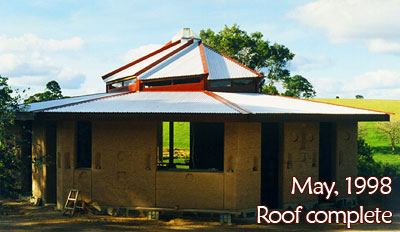
Here is the roof wearing its coat of tin - off-white colourbond with heritage red flashings.
It was a great moment when the rain stopped falling inside (-;
The plastic cupola on the apex is temporary until the brass 'n glass permanent construction is ready for installation.
|
The Cupola was next in line and was to prove a significant task
|
|