Temple webpage header
the gemstones ordered by hue, matched in pairs
The gemstones arranged by hue, matched in pairs

Gemstones Underfoot

aka The Sandstone part VI

We throw caution to the winds

We had left a narrow strip around the footings - be just hadn't added the mortar layer in the space adjacent to the dwarf wall in the patio area.

This had been reserved for a colourful display of the earth's treasures - this picture shows the stones arranged by hue in pairs.


We just turned two of the boards around and were able to place the gemstones in their correct and balanced sequence along the dwarf wall ready to be set in the mortar.

We needed to go to all that trouble to ensure the stones would be equally spaced and would fit neatly in the length available - with concrete and mortar its not easy to go back and adjust things after it starts to go off.

Here are the stones ready for the mortar - we added a clear quartz point between the gemstones to create another visual and energetic treat.

Gems in position ready for placing in the mortar


inserting the gemstones in the mortar

A snapshot of the process.

On the left is the empty channel with its concrete base.

The middle section show the gemstones placed in a bed of wet mortar.

On the right you can see the sprinkling of stone chips added and pressed into the mortar.


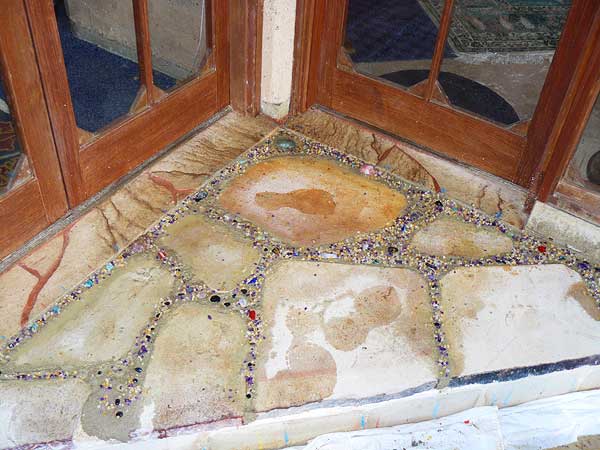
This is what the stones looked like in the still-wet mortar - the quartz points are not set finally as the sprinkling of gemstone chips around the stones has not been completed.

The blue chalk marks were what we used to check our spacings were matching on either side.

Gems in the still-wet mortar ready for the chips


The chips sprinkled around the gemstones
A detail showing the mixture of citrine, amethyst and rose quartz chips sprinkled on the wet mortar.

They still need to be pressed in gently to ensure the mortar gets a good grip on them so that they aren't washed, brushed, hosed or swept away.

This worked very well - our estimate is that we lost some but the number was insignificant - around .05%.


Here's what the process looks like - the mortar is quite stiff by now but still workable.

This lets us make sure the quartz points are pointing uprights, the stones haven't inadvertently been pushed too far into the mortar and the chips are well-held by the mortar.

The chair is a necessary luxury to save the knees - we've been working on the ground for nearly 4 hours at this stage and still need to concentrate completely on that tiny patch of the channel.

The small wooden bowl in front of the centre of the doors is holding the selection of stones we reserved for the centrepiece.

detailing the chips and making sure the quarz points are upright
detailing the chips and making sure the quartz points are upright


The Centrepiece - a bounty of the planets precious gifts and mans mimickry
The Centrepiece - a bounty of the planets precious gifts

The Centrepiece

We had saved some stones for the centre of the strip - here's how they turned out.

This group includes natural diamonds, rubies, emeralds, sapphires, peridot azeztulite and phenacite - a very potent blend of energy to grace the entrance.

The group is sheltered in the embrace of a lovely piece of Rose Quartz which is blessed by the sun's first rays on midwinter's morning.


The Steps get the treatment

Either side of the main doors are triangular raised sections which we frequently use as we move around.

These - again - deserved some special treatment and it seemed appropriate to add a man-made diamond (made of glass) - which I engraved to promote "looking within".

The steps being giving the gemstone treatment


The diamond installation details

To get the light to reflect from the internal surface it was necessary to make sure they were touching air and not mortar, otherwise it became rather dull and lifeless.

After much searching and experimentation we discovered that a Moccona coffee jar was the perfect width and height in which to sit the diamond.

The lapidary saw quickly produced 2 hollow plinths for the diamonds - you can see one here ready for the mortar.

The inset image shows the sparkling visual intrigue within.


And here's what one of the steps looked like when the detailing was completed.

The green stones are mostly emerald and the diamond is in the corner.

At this stage we felt we were finished - apart from the front steps which were a separate exercise.

The finished step
one of the finished steps


renaining exposed concrete is now gem-encrusted
remaining exposed concrete is now gem-encrusted

However the exposed concrete of the dwarf walls was now visually substandard and something clearly had to be done about that.

We had a jar of gemstone chips left and a trip to the local market (blessed with a crystal stall bearing a marvelous range of treasures) refitted our supplies and we encrusted the offending surface with more gems.

The brown staining is runoff from the encrusting process where we stained the mortar with brown colouring. The runoff from the final wet-washing stage produced brown puddles all around the place - more cleaning!


The Tour
go  to previous page back
to
part V
  go to top of this page
top
of this
page
  go to home page
home page
  next
is the
rainbow
serpent
go to the next page on the tour
return to top return to top of this page return to top