Our Wall of Food aka The Vertical Garden
Shade for the car and sustenance for the crew
It seemed to be (please forgive the metaphor) killing a whole flock of birds with a couple of stones so to speak - we could have
- a shade wall which let the air through preventing buildup of mould and other wet-season travails
- a wall of plants which produced fresh, guaranteed organic edible greenery
- a garden under the roof which would be sheltered from the Maleny rain which has proven to be the main obstacle to growing vegetables at Middle Path ( a lot of plants drown each wet season in the clay soil)
- a bunch of fun building something divine and daring in the spirit of the Temple
Here's how we went about it .......
We needed to use the existing carport structure with a minimum of structural additions.
Our first design was to hang a set of 300mm diameter semi-circular stainless steel (for durability) gutters from vertical timbers attached to the end rafter.
It didn't feel right - the extra timbers were obviously going to detract from the wonderful light and airy ambience of the carport (which had by now become a pleasant waiting-area for our clinic clients). And it wasn't going to be that inexpensive and the gutters were very thin (0.5mm) metal and we'd need brackets and ... and .... and ....
Impressed by the cost and construction of the stainless steel hangers for the carport rafters we approached the fabricators to see what they would charge to make something similar.
| The garden trough design specs |
|
|
Once the laughter had died down (funny how often we have had that response when we explain to the professional building franternity what we want to do) we were told they couldn't do it for a variety of reasons and, anyway, there was only one person on the Sunshine Coast who could work 3 metre sheets of stainless.
So we went to see Craig Lambert at the Metal Shed in Kunda Park with this diagram.
|
The basic building block
Here is what the troughs looked like - there's a handful of potting mix in it to give some sense of dimension.
The metal is twice as thick (1 mm) as the gutters would have been, the troughs contain 27% more growing space and their rectangular cross section makes them much easier to deal with than the round guttering would have been.
Oh yes - they ended up being much less expensive than the guttering would have been as well as being bigger and sronger - thanks Craig. |
|
| A garden trough internal empty (apart from a handful of mix) |
|
| Trough drainage underneath |
|
|
Trough drainage
Obviously there was a need for drainage but we wanted to minimise the loss of nutrients so we confined the drains to one end of the trough and sloped the troughs so that the low end of each one drained into the high end of the one below.
|
A tea-strainer mesh covers the inside to prevent loss of soil mix and we used a irrigation barb to make sure the drain water didn't run along the bottom of the trough and miss the trough below.
I was also concerned to avoid unsightly stains caused by dried deposits on the attractive exteriors of the troughs to be honest. |
|
|
| |
|
Trough support detail
Here is what supports the troughs - a length of 4mm stainless rod bent to form a cradle with hooks to fit the chain for ease of positioning.
This proved to be an excellent design which made it very easy to adjust the trough's height and slope. They also grabbed the troughs firmly once the potting mix added some weight. |
Trough support
- the bigger picture
The chain was simply looped over the carport rafter with a single screw in through a link to prevent it slipping.
Again we were impressed with the ease of putting it all together compared to more conventional structures.
Those cradles in the picture were intended to spread the chain so that the top trough wall weren't squeezed inwards by the angle of the supporting chain.
The weight of the filled troughs ended up bending these cradles quite dramatically. |
|
| Trough support the bigger picture |
|
| Trough support the big picture |
|
|
Trough support - the inside picture
And here is what is supporting the inside end of the rafter - a length of 50X5mm stainless bar with 2 M12 stainless bolts through the temple rafter and the carport rafter.
This was where I had felt there might be a problem with the weight of the troughs.
This piece of metal - and more importantly, the rafter it hangs from - are effectively carrying the load of all the troughs and their contents - well half their weight - which would have to be in the neighbourhood of 250Kg.
It has proved very equal to the task even though the rafter itself (200X50 red ironbark) has developed a noticable sag once the full load (soil + water + plants) was in place. |
Trough tether
There was only one drawback apparent once the troughs were hanging up - a strong wind would blow them to and fro which is not an appealing feature of any carport wall'
Especially when the car in it is new and the swinging objects are heavy and made of metal.
We chose to tether the bottom of the chains with an extra length of chain attached to an eyebolt cemented in the top of a small concrete column.
This allowed them to move in the breeze - but not too far! |
|
|
| |
|
Adding potting mix
The obvious way to fill the troughs was by bucket.
Shovelling was fine for the bottom one but out-of-the-question for the top ones.
We needed just over half a cubic metre (>500 litres) of mix to fill the troughs.
This came to about 21 25-litre bags full. |
Potting mixing crew
An inexpensive organic “nursery grade” potting mix was souped up with:
- sheep manure (fast food)
- rock powder (microbe food)
- dynamic lifter (slow food)
- dolomite (sweet food)
- a little sweat (a warm day)
- blood & bone (favourite food)
- and no tears (a happy mixing)
A light and fluffy cheerful superfood smoothie for plants was created to fill the troughs. |
|
|
| Our vertical garden in action as it looked on Saturday, 18 January 2014 |
|
|
The result - day 1
What it looked like once we added the plants (January 18th, 2014).
We planted “a bit of everything” just to see what would work, including:
- Parsley
- Sage
- Rosemary
- (and) Thyme
- Basils
- Coriander
- Tarragon
- Tomatoes
- Cucumbers
- Lettuces
- Spinach
- Capsicums
- Strawberrys
- Petunias for colour
|
Our vertical garden mulched
After the plants were in we mulched it.
Half out of habit and half to retain the moisture.
Here's what it looked like from the inside of the carport / waiting area looking out.
It certainly hasn't damaged the ambience of the waiting area.
Or our food bills.
Or the deliciousness of our salads. |
|
| Our vertical garden mulched as it looked on Saturday, 18 January 2014 |
|
So that's the story - to date - of the north wall of the carport - but there was still the west side - we still wanted a shield for the fierce western afternoon sun.
And that is another - closely related - story.
As time goes by .....
| Our vertical garden on February 10th, 2014 |
|
|
And here's what it looked like on February 10th - day 24
We've been a bit amazed by the enthusiasm of the plants.
We were eating out of the garden - well nibbling really - after 10 days and after 3 weeks we were getting all the greens we needed for a main meal daily.
We'll keep this page up to date(ish) on how its doing. |
And here's what it looked like on February 17th - day 31
We've been a bit amazed by the enthusiasm of the plants.
I was getting a bit concerned about the cucumbers - they seemed to be reaching out of the trough like feral triffids complete with botanical garrotts.
At this stage the food wall is producing as much as we need in the way of green leafy vegetables. |
|
| Our vertical garden on February 17th, 2014 |
|
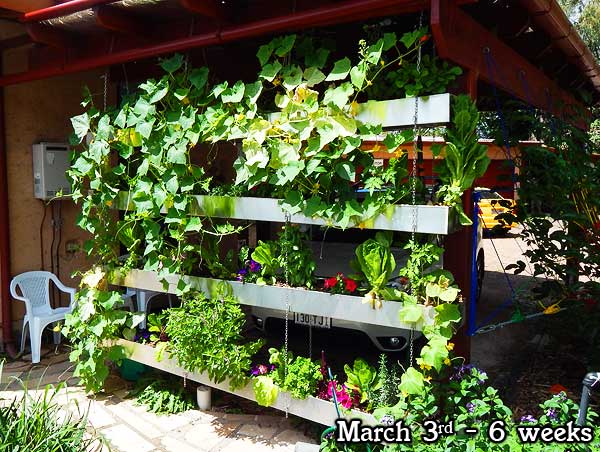
| Our vertical garden - now known as the Foodwall - on March 3rd, 2014 |
|
|
And here's what it looked like on March 3rd - day 24
We continue to be amazed by the plants' enthusiasm.
Still nervous about getting too close to those cucumber tendrils - keep hearing that riff from the War of the Worlds ... "and still .... they came". |
And here's what it looked like on May 15th - day 118
Several crops have passed on - cucumbers, 2 generations of cos lettuce.
The tomatoes are maturing nicely - for cherry tomatoes they are quite huge (about 30mm), the capsicum are tasty and the winter greens are settling in nicely.
The wall continues to provide all the green medicine food 2 people need. |
|
| Our vertical garden on March 15th, 2014 |
|
| the Foodwall on July 27th, 2014 |
|
|
And here's what it looked like on July 27th - day 190
The bees have fallen in love with the Basil flowers and have added is a continual friendly buzzing throughout the day.
The wall continues to provide us with 100% of our salad ingredients and the tomatoes continue to grow vigorously and set new fruit even though it is mid-winter and other gardens in the area have been severely frost-burnt. |
|
|